Smooth audio file transcription! Noise reduction and volume normalization in Python (Google Colab)
Contents
(Gemini 1.5 Pro) You are a professional web writer. Write an article introducing the following code. It is an introduction to code that reduces noise and normalizes audio before transcription. Please explain it so that even people who have never used Python can understand.
When transcribing audio data, background noise and inconsistent volume levels can be a real headache. Advance preparation is especially essential when processing a large number of files.
Following up on my previous post,[1]Batch-correcting typos using an Excel table (Google Colab). https://plaza.umin.ac.jp/shoei05/index.php/2024/05/25/2518/ this article introduces how to automatically reduce noise and normalize volume in audio files using Google Colaboratory (Colab) and Python.
Here is the GitHub repository:[2]https://github.com/shoei05/soundfile_normalization/
First
I also created a custom GPT bot that performs noise reduction and normalization in the same way. Click "Where should I start?" (何から始めたらいい?) and follow the instructions.
https://chatgpt.com/g/g-blH6IXYg6-soundfile-normalization
1. Overview of the steps
- Run the Colab notebook
- Upload your audio data (supports ".wav", ".mp3", ".mp4", ".m4a", ".mkv", and ".webm")
- Noise reduction and audio normalization run automatically
- The processed audio data downloads automatically
Noise reduction
Audio data often contains sounds other than the target voice, such as ambient environmental noise or equipment hum. This noise degrades the accuracy of speech recognition and analysis. Therefore, noise reduction is an important process for obtaining clear audio data.
Noise reduction is the process of identifying and removing unwanted noise from audio data. Several methods exist, but most either use differences in the frequency characteristics of speech and noise, or use machine learning to learn and remove noise patterns.
The code in this article uses FFmpeg's afftdn filter to remove noise.
denoise_command = f"ffmpeg -i {temp_wav} -af 'afftdn=nr={noise_reduction_db}' {temp_denoised} -y"
if os.system(denoise_command) != 0:
    raise RuntimeError(f"Error executing ffmpeg command: {denoise_command}")Code language: JavaScript (javascript)
afftdn is an FFmpeg filter that removes audio noise using FFT (Fast Fourier Transform). The nr parameter specifies the strength of the noise reduction; the higher the value, the stronger the noise reduction.
Here, it is set to noise_reduction_db = 10. This sets the noise reduction strength to 10 dB. The optimal strength depends on the noise level and type of noise in your audio data.
Volume normalization
Audio normalization adjusts the volume level. Volume levels can vary depending on the recording environment and equipment, which may make the audio hard to hear or prevent speech recognition tools from processing it accurately. Standardizing the audio to an appropriate volume level through normalization improves both intelligibility and processing accuracy.
This code normalizes the audio using the normalize function from the pydub library. This function detects the peak level of the input audio signal and adjusts it to 0 dBFS (decibels relative to full scale), making the volume as loud as possible without clipping.
# 音声の正規化
        normalized_audio = normalize(audio)Code language: PHP (php)
With these parameters, you can create easy-to-hear audio data with consistent levels, similar to those used in broadcast standards.
2. Running the code in Colab
Save a copy of the Google Colab notebook below to your own Google Drive.
If you want to learn more about Google Colab, please refer to "Introduction to Python Programming" (Pythonプログラミング入門)[3]Center for Research and Development of Higher Education, The University of Tokyo. Introduction to Python Programming. https://utokyo-ipp.github.io/ published by the Mathematics and Informatics Center at the University of Tokyo.
https://colab.research.google.com/drive/1S9gfGZZ2NleEv6QgH51dxu2s95sOfgQ2?usp=sharing
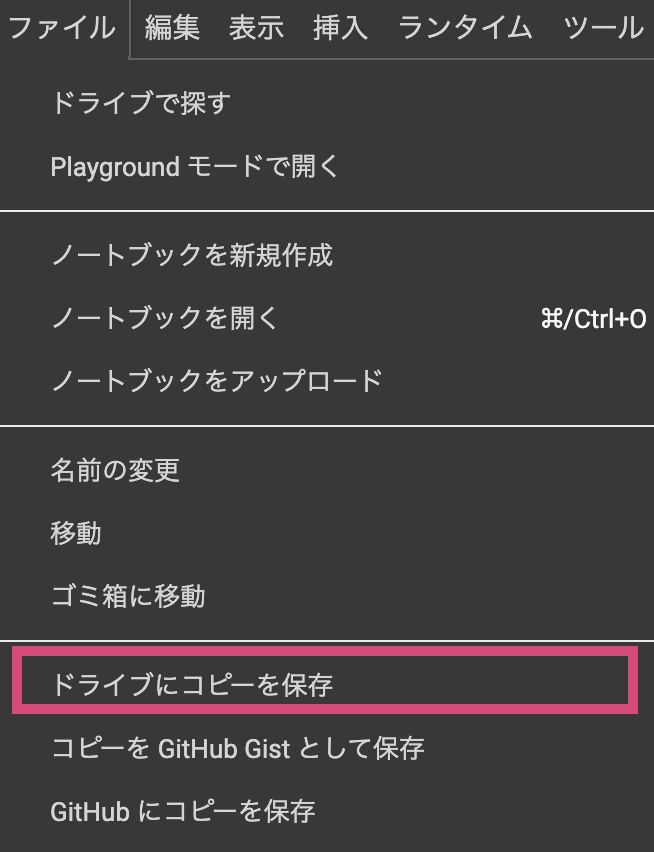
Once you have saved a copy, click the play button to run the code.

After a moment, the prompt "Please upload audio data" (音声データをアップロードしてください) will appear near the bottom of the code block. Upload your audio file (".wav", ".mp3", ".mp4", ".m4a", ".mkv", or ".webm"). Video files can also be processed.
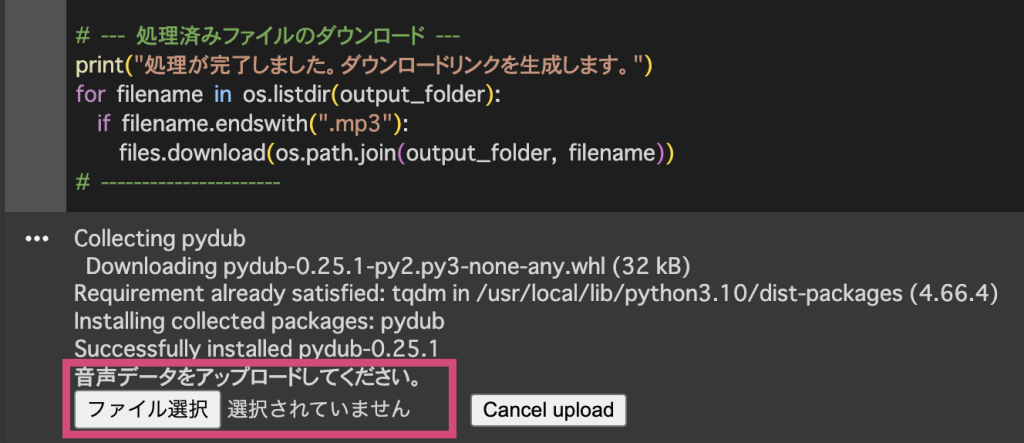
Once processing finishes, the file will download automatically.
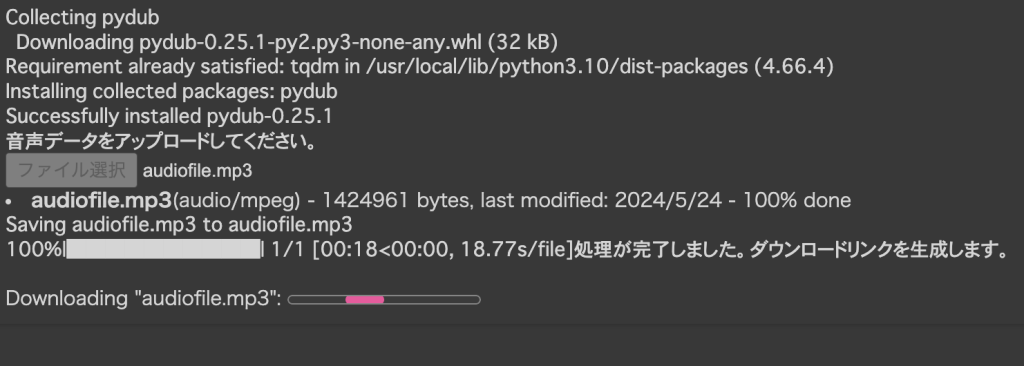
.ipynb code to run in Colab
!pip install pydub tqdm

import os
from pydub import AudioSegment
from tqdm import tqdm
import logging
from concurrent.futures import ThreadPoolExecutor
import shutil
import tempfile
import uuid
import ipywidgets as widgets
from google.colab import files

# ログの設定
logging.basicConfig(filename='preprocessing.log', level=logging.INFO,
                    format='%(asctime)s - %(levelname)s - %(message)s')

def replace_spaces(filename):
    return filename.replace(" ", "_")

def preprocess_audio(input_path, output_path, noise_reduction_db, done_folder):
    try:
        if not os.path.exists(input_path):
            raise FileNotFoundError(f"Input file not found: {input_path}")

        temp_dir = tempfile.gettempdir()
        temp_id = str(uuid.uuid4())
        temp_wav = os.path.join(temp_dir, f"temp_{temp_id}.wav")
        temp_denoised = os.path.join(temp_dir, f"temp_denoised_{temp_id}.wav")
        temp_normalized = os.path.join(temp_dir, f"temp_normalized_{temp_id}.wav")

        _, extension = os.path.splitext(input_path)
        extension = extension.lower()

        # オーディオファイルを読み込んで一時的にwav形式で保存
        audio = AudioSegment.from_file(input_path, format=extension.lstrip('.'))
        audio.export(temp_wav, format="wav")

        # ノイズ除去
        denoise_command = f"ffmpeg -i {temp_wav} -af 'afftdn=nr={noise_reduction_db}' {temp_denoised} -y"
        if os.system(denoise_command) != 0:
            raise RuntimeError(f"Error executing ffmpeg command: {denoise_command}")

        # サンプリングレートの変換と正規化
        audio = audio.set_frame_rate(16000)
        normalized_audio = normalize(audio)

        # 正規化された音声を読み込んでmp3形式で保存
        normalized_audio = AudioSegment.from_wav(temp_normalized)
        normalized_audio.export(output_path, format="mp3")

        # 処理したファイルをdoneフォルダに移動
        shutil.move(input_path, os.path.join(done_folder, replace_spaces(os.path.basename(input_path))))

        logging.info(f"Preprocessed {input_path}")

    except Exception as e:
        logging.error(f"Error processing {input_path}: {str(e)}")
        raise

    finally:
        # 一時ファイルを削除
        for temp_file in [temp_wav, temp_denoised, temp_normalized]:
            if os.path.exists(temp_file):
                os.remove(temp_file)

def process_files(input_folder, output_folder, noise_reduction_db, max_workers, done_folder):
    audio_files = [f for f in os.listdir(input_folder) if f.lower().endswith((".wav", ".mp3", ".mp4", ".m4a", ".mkv", ".webm"))]
    total_files = len(audio_files)

    progress_bar = tqdm(total=total_files, unit='file')

    with ThreadPoolExecutor(max_workers=max_workers) as executor:
        futures = []
        for filename in audio_files:
            input_path = os.path.join(input_folder, filename)
            output_path = os.path.join(output_folder, f"{os.path.splitext(replace_spaces(filename))[0]}.mp3")
            futures.append(executor.submit(preprocess_audio, input_path, output_path, noise_reduction_db, done_folder))

        for future in futures:
            try:
                future.result()
                progress_bar.update()
            except Exception as e:
                logging.error(f"Error in parallel processing: {str(e)}")

    progress_bar.close()


# --- 音声データファイルのアップロード ---
input_folder = '/content/p_input'
output_folder = '/content/input'
done_folder = '/content/p_done'
os.makedirs(input_folder, exist_ok=True)
os.makedirs(output_folder, exist_ok=True)
os.makedirs(done_folder, exist_ok=True)

while True:
  print("音声データをアップロードしてください。")
  uploaded = files.upload()
  for filename in uploaded.keys():
    shutil.move(filename, os.path.join(input_folder, filename))
  break
# ----------------------

noise_reduction_db = 10
max_workers = 4

process_files(input_folder, output_folder, noise_reduction_db, max_workers, done_folder)

# --- 処理済みファイルのダウンロード ---
print("処理が完了しました。ダウンロードリンクを生成します。")
for filename in os.listdir(output_folder):
  if filename.endswith(".mp3"):
    files.download(os.path.join(output_folder, filename))
# ----------------------Code language: PHP (php)
Running Python on your local PC
Preparation
1. Install Python
If you haven't installed Python yet, download and install it from the official Python website.
Open the Command Prompt or Terminal,
- Windows: Press the Windows key, type "cmd", and press Enter.
- Mac: Click Spotlight Search (the magnifying glass icon), type "Terminal", and press Enter.
python -VType the above command, and if
Python 3.12.3Code language: CSS (css)something like this is displayed, Python is already installed.
2. Install required libraries
Open the Command Prompt or Terminal and run the following command to install the required libraries.
pip install pydub tqdm3. Install FFmpeg
FFmpeg is free software capable of editing and converting video and audio.[4]FFmpeg. Accessed May 4, 2021. https://www.ffmpeg.org/
Please refer to my previous article below for instructions on how to install FFmpeg.
 When asked for audio/video presentation slides at an academic conference: Compressing .mp4 file sizes with FFmpegshoei05.com
4. Prepare the code and files
Copy the code below, save it as soundfile_normalization.py, and place it alongside the audio files (".wav", ".mp3", ".mp4", ".m4a", ".mkv", ".webm") you want to process. Set up the directory structure as follows.
任意のフォルダ
   ├── soundfile_normalization.py
   ├── input (フォルダ)
   │└── (音声データを入れる)
   ├── output (コードを実行したら自動で生成されます)
   │└── (処理後の音声データが自動で格納されます)
   └── done_original (コードを実行したら自動で生成されます)
    └── (処理後の元データが自動で格納されます)  Code language: CSS (css)
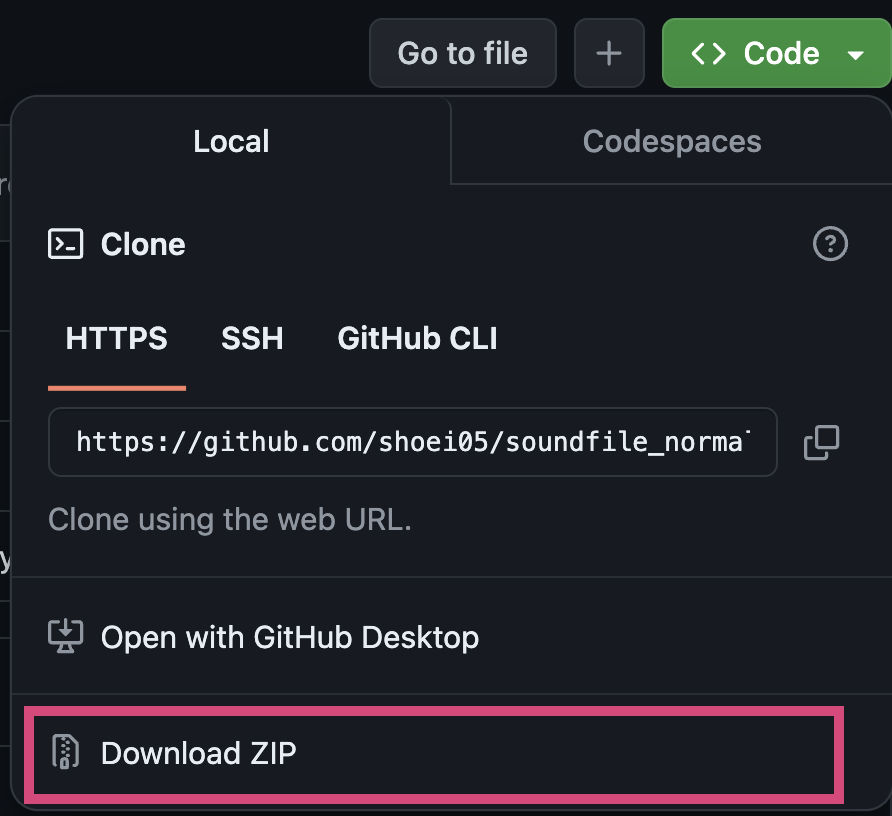
You can also download it from GitHub. If you have Git installed, clone it with:
git clone https://github.com/shoei05/soundfile_normalization.gitCode language: PHP (php)Alternatively, you can download the ZIP file from:
https://github.com/shoei05/soundfile_normalization/tree/main
.
Python code
import os
from pydub import AudioSegment
from pydub.effects import normalize
from tqdm import tqdm
import logging
from concurrent.futures import ThreadPoolExecutor
import shutil
import tempfile
import uuid

# ログの設定
logging.basicConfig(filename='preprocessing.log', level=logging.INFO,
                    format='%(asctime)s - %(levelname)s - %(message)s')

def replace_spaces(filename):
    return filename.replace(" ", "_")

def preprocess_audio(input_path, output_path, noise_reduction_db, done_folder):
    try:
        if not os.path.exists(input_path):
            raise FileNotFoundError(f"Input file not found: {input_path}")

        temp_dir = tempfile.gettempdir()
        temp_id = str(uuid.uuid4())
        temp_wav = os.path.join(temp_dir, f"temp_{temp_id}.wav")
        temp_denoised = os.path.join(temp_dir, f"temp_denoised_{temp_id}.wav")

        _, extension = os.path.splitext(input_path)
        extension = extension.lower()

        # オーディオファイルを読み込んで一時的にwav形式で保存
        audio = AudioSegment.from_file(input_path, format=extension.lstrip('.'))
        audio.export(temp_wav, format="wav")

        # ノイズ除去
        denoise_command = f"ffmpeg -i {temp_wav} -af 'afftdn=nr={noise_reduction_db}' {temp_denoised} -y"
        if os.system(denoise_command) != 0:
            raise RuntimeError(f"Error executing ffmpeg command: {denoise_command}")

        # ノイズ除去後の音声を読み込み
        audio = AudioSegment.from_wav(temp_denoised)

        # サンプリングレートの変換
        audio = audio.set_frame_rate(16000)

        # 音声の正規化
        normalized_audio = normalize(audio)

        # 正規化された音声を読み込んでmp3形式で保存
        normalized_audio.export(output_path, format="mp3")

        # 処理したファイルをdoneフォルダに移動
        shutil.move(input_path, os.path.join(done_folder, replace_spaces(os.path.basename(input_path))))

        logging.info(f"Preprocessed {input_path}")

    except Exception as e:
        logging.error(f"Error processing {input_path}: {str(e)}")
        raise

    finally:
        # 一時ファイルを削除
        for temp_file in [temp_wav, temp_denoised]:
            if os.path.exists(temp_file):
                os.remove(temp_file)

def process_files(input_folder, output_folder, noise_reduction_db, max_workers, done_folder):
    audio_files = [f for f in os.listdir(input_folder) if f.lower().endswith((".wav", ".mp3", ".mp4", ".m4a", ".mkv", ".webm"))]
    total_files = len(audio_files)

    progress_bar = tqdm(total=total_files, unit='file')

    with ThreadPoolExecutor(max_workers=max_workers) as executor:
        futures = []
        for filename in audio_files:
            input_path = os.path.join(input_folder, filename)
            output_path = os.path.join(output_folder, f"{os.path.splitext(replace_spaces(filename))[0]}.mp3")
            futures.append(executor.submit(preprocess_audio, input_path, output_path, noise_reduction_db, done_folder))

        for future in futures:
            try:
                future.result()
                progress_bar.update()
            except Exception as e:
                logging.error(f"Error in parallel processing: {str(e)}")

    progress_bar.close()

if __name__ == "__main__":
    input_folder = './p_input'
    output_folder = './input'
    done_folder = './p_done'
    noise_reduction_db = 10
    max_workers = 4

    os.makedirs(output_folder, exist_ok=True)
    os.makedirs(done_folder, exist_ok=True)

    process_files(input_folder, output_folder, noise_reduction_db, max_workers, done_folder)Code language: PHP (php)
5. Execution
In the Command Prompt or Terminal, use the cd command to navigate to the directory containing the soundfile_normalization.py file. You can also refer to my previous article.
 Batch-correcting typos using an Excel table (Google Colab)shoei05.com
Run the following command.
python sound_normalization.pyCode language: CSS (css)Once processing finishes, an output folder is automatically created containing the processed audio files in .mp3 format. The original unprocessed files are moved to the input_original folder.
This process runs in parallel. If you put multiple audio files into the folder and run the code, it will batch-process the noise reduction and normalization for all of them at once.
Summary
As the second installment introducing Python scripts I use regularly, this article presented a method to automate noise reduction and volume normalization for audio data.
Improving audio quality not only directly boosts transcription accuracy, but also helps when developing systems that use speech recognition or delivering more comfortable audio content. Please use this code as a reference and try it out in your own environment.
References
| ↑1 | Batch-correcting typos using an Excel table (Google Colab). https://plaza.umin.ac.jp/shoei05/index.php/2024/05/25/2518/ |
|---|---|
| ↑2 | https://github.com/shoei05/soundfile_normalization/ |
| ↑3 | Mathematics and Informatics Center, The University of Tokyo. Introduction to Python Programming. https://utokyo-ipp.github.io/ |
| ↑4 | FFmpeg. Accessed May 4, 2021. https://www.ffmpeg.org/ |