When asked for audio/video presentation slides at an academic conference: Compressing .mp4 file sizes with FFmpeg
Contents
- Downloading and installing FFmpeg
- For Mac
- Installing Homebrew
- Installing FFmpeg
- (Optional) Enable launching Terminal from Finder
- For Windows
- Compressing file size with FFmpeg
- For Mac
- Launching Terminal
- Compressing the size with FFmpeg
- Update: For videos recorded directly with a camera (converting codecs)
- If -crf cannot be used for some reason
- Other operations
- Closing thoughts
With the spread of COVID-19, more academic conferences and workshops are being held online. Presenters are sometimes asked to submit audio and video files with specific guidelines, such as "Please create an .mp4 file under 500 MB." Yet few places explain how to reduce video file sizes, leaving many people unsure of what to do. In this post, I will introduce how to compress videos using the free software FFmpeg. While this post currently focuses on Mac, I will add instructions for Windows at a later date.
Once you learn the setup and procedure, it is far easier than searching for editing software or online services from scratch every time you need them. When you have some spare time, I hope you will treat this as an investment in yourself and give the steps in this article a try.
Downloading and installing FFmpeg
FFmpeg is free software that allows you to edit and convert videos.[1]FFmpeg. Accessed May 4, 2021. https://www.ffmpeg.org/
For Mac
Installing Homebrew
If you have not yet installed Homebrew,[2]Homebrew. Homebrew. Accessed May 4, 2021. https://brew.sh/index_ja a package manager that includes FFmpeg, install it now.
First, launch Terminal from Other > Terminal.
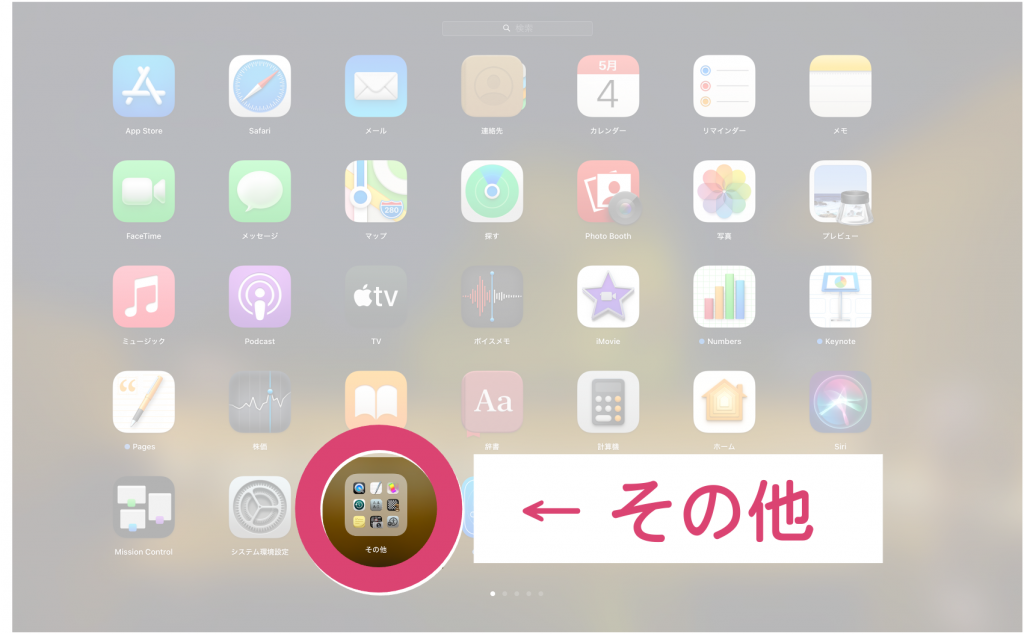
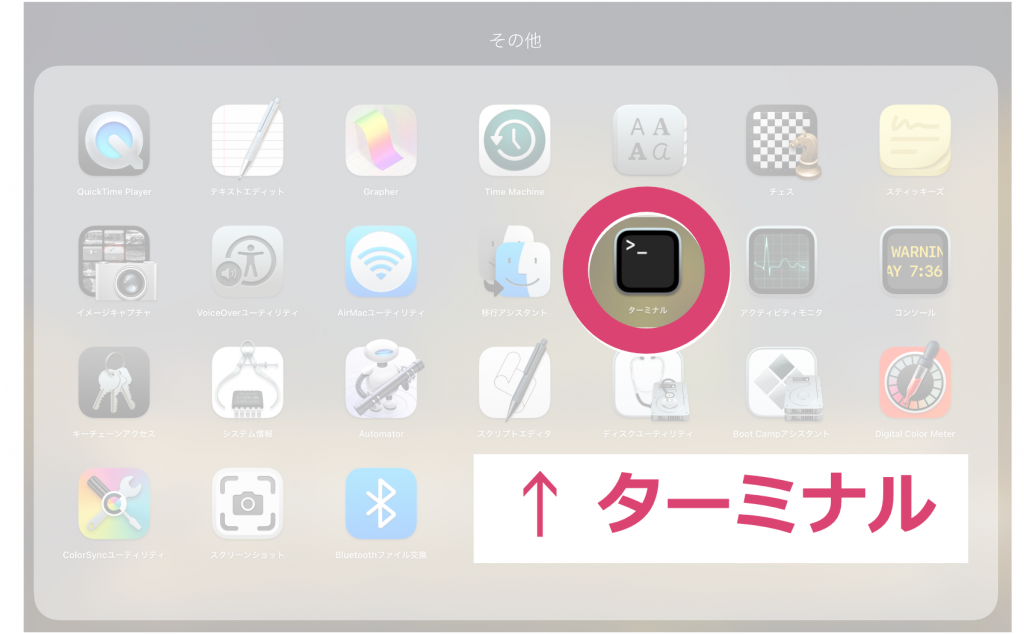
Once Terminal is open, run the code listed on the official Homebrew page shown below. You can simply copy and paste it as is.
/bin/bash -c "$(curl -fsSL https://raw.githubusercontent.com/Homebrew/install/HEAD/install.sh)"Code language: JavaScript (javascript)Installing FFmpeg
Once the Homebrew installation is complete, run the following command in Terminal to install FFmpeg.
brew install ffmpeg(Optional) Enable launching Terminal from Finder
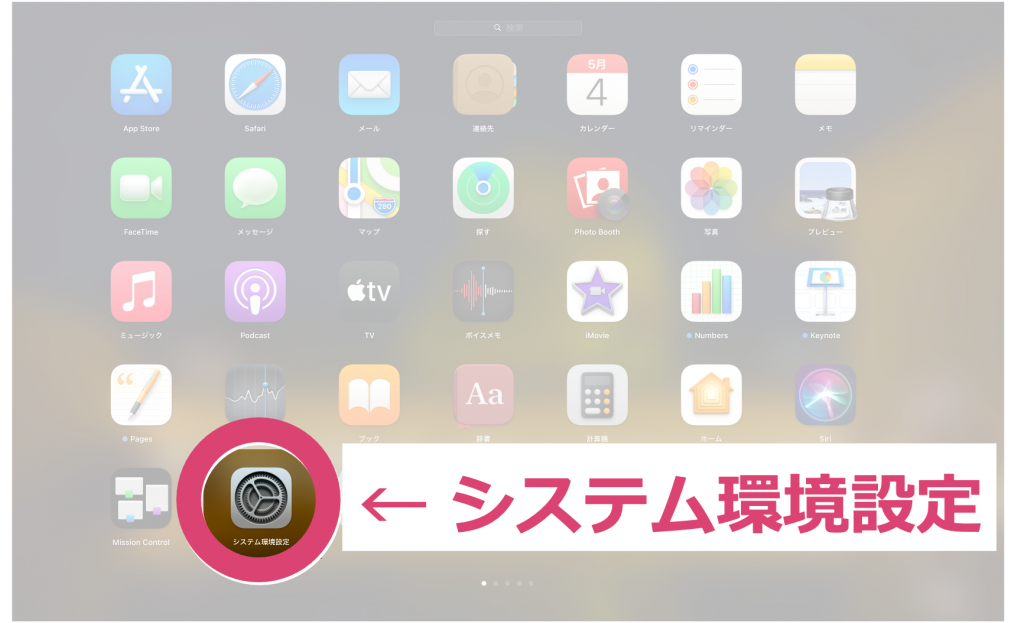
To make future operations easier, configure the following setting. Go to System Preferences > Keyboard, select Shortcuts > Services, and under the Files and Folders section, check "New Terminal at Folder."
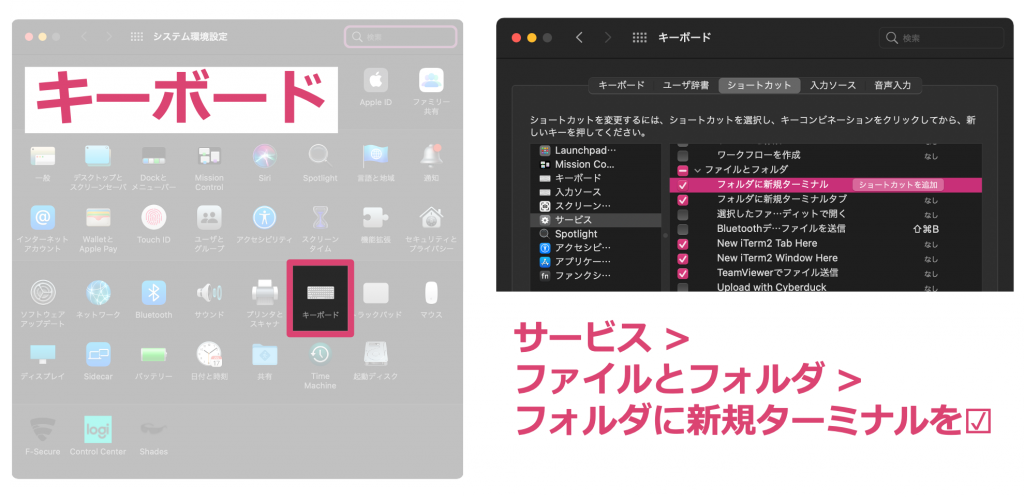
Your setup is now complete.
For Windows
On Windows, the easiest method is to install it using the package manager winget. Please refer to this article,[3]Roboin. How to install FFmpeg on Windows 11 without setting PATH. Roboin Blog. Published February 25, 2024. Accessed May 26, 2024. … Continue reading which summarizes the steps well.
Compressing file size with FFmpeg
For Mac
Launching Terminal
First, navigate in Finder to where you can see the folder containing your target file. Here, let's assume the target file "test.mp4" is inside a folder named "movie."
Right-click the target folder (movie), and under "Services," select the "New Terminal at Folder" command.
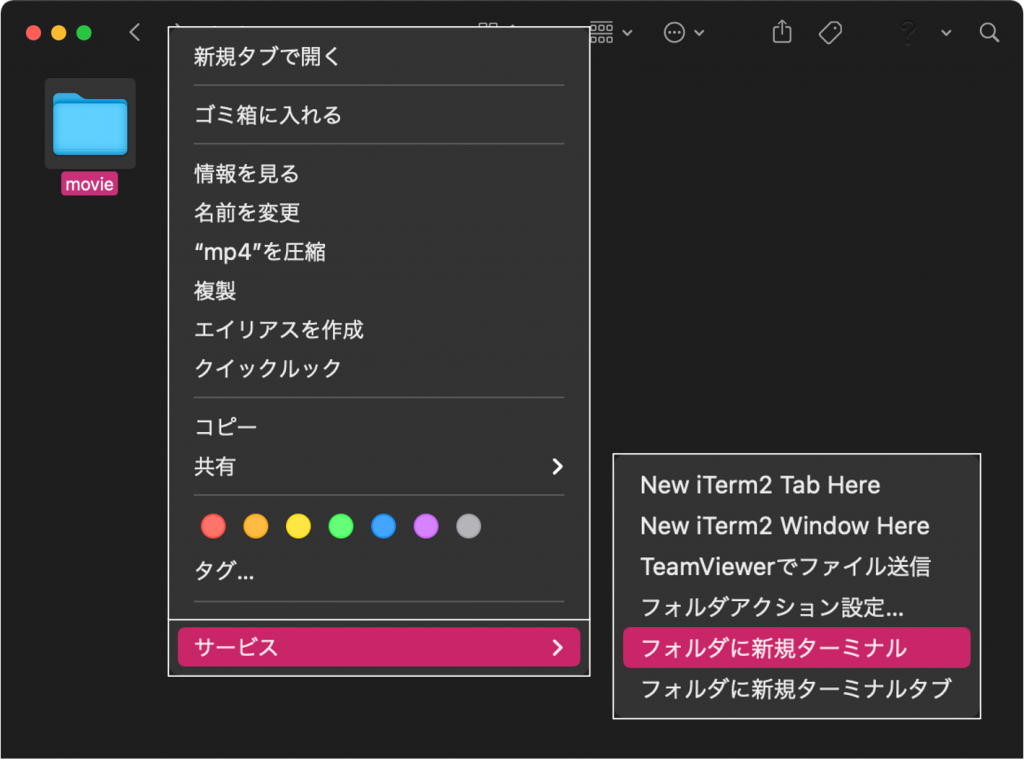
When Terminal launches,
Last login: Tue May  4 15:49:32 on ttys000
user@host movie % Code language: CSS (css)
it opens with the "movie" folder already set as the current directory, as shown above (which lets you skip typing out directory navigation commands).
Compressing the size with FFmpeg
Now, let's compress the video named test.mp4 inside the "movie" folder. If we name the compressed file test_compression.mp4, we can compress it with the following command.
ffmpeg -i test.mp4 -crf 18 test_compression.mp4Code language: CSS (css)The number 18 here is the CRF (compression rate) setting, which you can adjust freely. Lower numbers yield higher image quality but less compression. The default is 23. Some articles recommend a range of 18–28,[4]Encoding with H.264: tech.ckme.co.jp. Accessed May 4, 2021. https://tech.ckme.co.jp/ffmpeg_h264.shtml but considering the nature of academic presentation videos—which consist mostly of still slides—values around 28–32 should not cause any major issues with legibility. If you want to convert the video without losing quality, specifying 18 or lower is a safe choice.
Running the command starts the compression. If the video is only a few minutes long, it will not take much time. A 90-minute video takes about 10 to 20 minutes, so wait for it to finish. Try experimenting a few times with different CRF values to meet the submission file size limit for your conference.
In this case, I was able to compress a 140-minute, 2.07 GB video down to 507.5 MB using CRF 18.
Update: For videos recorded directly with a camera (converting codecs)
I referred to this article.
Videos recorded with camcorders or similar devices are sometimes saved in the H.264 format. You can check the video information by entering:
ffmpeg -i input.mp4Code language: CSS (css)and if the output shows something like:
Stream #0:0[0x1](und): Video: h264 (High) (avc1 / 0x31637661), yuv420p(tv, bt709/bt709/iec61966-2-4, progressive), 1920×1080 [SAR 1:1 DAR 16:9], 8134 kb/s, 59.94 fps, 59.94 tbr, 60k tbn (default)
you may be able to compress the video further.
ffmpeg -i input.mp4 -c:a copy -c:v libx265 -crf 22 -tag:v hvc1 output.mp4Code language: CSS (css)By entering the following command to encode the video into the H.265 format, you can reduce the file size with almost no loss in image quality.
If -crf cannot be used for some reason
Alternatively, you can reduce the video size using a command like the following.
ffmpeg -i input.mp4 -vcodec libx265 -b:v 2000k output.mp4Code language: CSS (css)This command uses the -b:v 2000k option to set the video bitrate to 2 Mbps. The lower the bitrate, the smaller the file size, though the image quality will degrade.
You can also use the following options to reduce the video file size.
-vf scale=<width>:<height>: Resizes the video to the specified width and height.-acodec <codec>: Encodes the audio with the specified codec. For example,libopusoraac.
Example:
ffmpeg -i input.mp4 -vf scale=480:270 output.mp4Other operations
Videos created with Mac screen capture and similar tools have the .mov extension. You can also convert these to .mp4 using FFmpeg. I referred to this article for the command.[5]How to convert from .MOV to .mp4 using ffmpeg – Kakkun's Study Log. Accessed May 4, 2021. https://kakubari-ryusei.hatenablog.com/entry/2017/10/12/153003 Here, let's convert test.mov to test.mp4.
ffmpeg -i test.mov -pix_fmt yuv420p test.mp4Code language: CSS (css)As a more advanced technique, you can combine commands to batch-convert all files in a folder.
For example, to batch-convert from .mov to .mp4, run the following in the target folder:
find . -name "*.mov" -type f | xargs -I {} basename {} .mov | xargs -I {} ffmpeg -i {}.mov -pix_fmt yuv420p {}.mp4Code language: JavaScript (javascript)To batch-compress .mp4 files:
find . -name "*.mp4" -type f | xargs -I {} basename {} .mp4 | xargs -I {} ffmpeg -i {}.mp4 -crf 18 {}_compression.mp4Code language: JavaScript (javascript)This command finds files with the .mp4 extension and creates a list,
find . -name "*.mp4" -type fCode language: JavaScript (javascript)uses that list with the .mp4 extension stripped from each item,
xargs -I {} basename {} .mp4Code language: CSS (css)and goes through the list one by one from the top—compressing [item 1].mp4 at a CRF of 18 to create [item 1]_compression.mp4, compressing [item 2].mp4 at a CRF of 18 to create [item 2]_compression.mp4, and so on—
xargs -I {} ffmpeg -i {}.mp4 -crf 18 {}_compression.mp4Code language: CSS (css)chaining this sequence of commands together into a single line using |. Take a look at the URLs cited in the tweet below for reference.
To combine video and audio into a single video file using ffmpeg, run the following command.
ffmpeg -i video.mp4 -i audio.wav -c:v copy -c:a aac -map 0:v:0 -map 1:a:0 output.mp4Code language: CSS (css)I adapted this code from the following source.[6]ffmpegを使って映像と音声を結合する (Combining video and audio using FFmpeg). Qiita. Accessed December 24, 2022. https://qiita.com/niusounds/items/f69a4438f52fbf81f0bd
Closing thoughts
At present, online conferences are largely viewed as a fallback when in-person events cannot be held. Yet with new variants spreading in the fourth wave, we are forced to rethink our long-term outlook, and academic conferences will likely continue online for the next several years. I hope this article proves useful to you.
For the COVID-19 situation as of May 2021, please also see the article below by Professor Nishiura.
References
| ↑1 | FFmpeg. Accessed May 4, 2021. https://www.ffmpeg.org/ |
|---|---|
| ↑2 | Homebrew. Homebrew. Accessed May 4, 2021. https://brew.sh/index_ja |
| ↑3 | Roboin. 【Windows 11】PATHの設定なしでFFmpegをインストールする方法 (How to install FFmpeg on Windows 11 without setting PATH). Roboin Blog. Published February 25, 2024. Accessed May 26, 2024. https://roboin.io/article/2024/02/25/install-ffmpeg-to-windows/ |
| ↑4 | H.264でエンコード (Encoding with H.264): tech.ckme.co.jp. Accessed May 4, 2021. https://tech.ckme.co.jp/ffmpeg_h264.shtml |
| ↑5 | ffmpegを用いて、.MOVから.mp4に変換する方法 – かっくんの学習記録 (How to convert .MOV to .mp4 using FFmpeg – Kakkun's Study Log). Accessed May 4, 2021. https://kakubari-ryusei.hatenablog.com/entry/2017/10/12/153003 |
| ↑6 | ffmpegを使って映像と音声を結合する (Combining video and audio using FFmpeg). Qiita. Accessed December 24, 2022. https://qiita.com/niusounds/items/f69a4438f52fbf81f0bd |